As a company, you can choose from the following options to determine the stock count method you want to use when counting your stock.
-
Supplier Items by Suppliers
-
Supplier Items by Categories
-
Stock Items by Categories
If you have multiple restaurants within your company, the selected stock count method will be applied to all of them. This configuration will be handled by Zonal during the initial setup process.
Prerequisites
Before you can start counting your stock, you will need to select which suppliers and which stock categories you want to use, as well as the order in which you would like them to appear. The Stock Count / Stock Item page will only display those items that belong to the selected stock categories from the selected suppliers.
Step 1
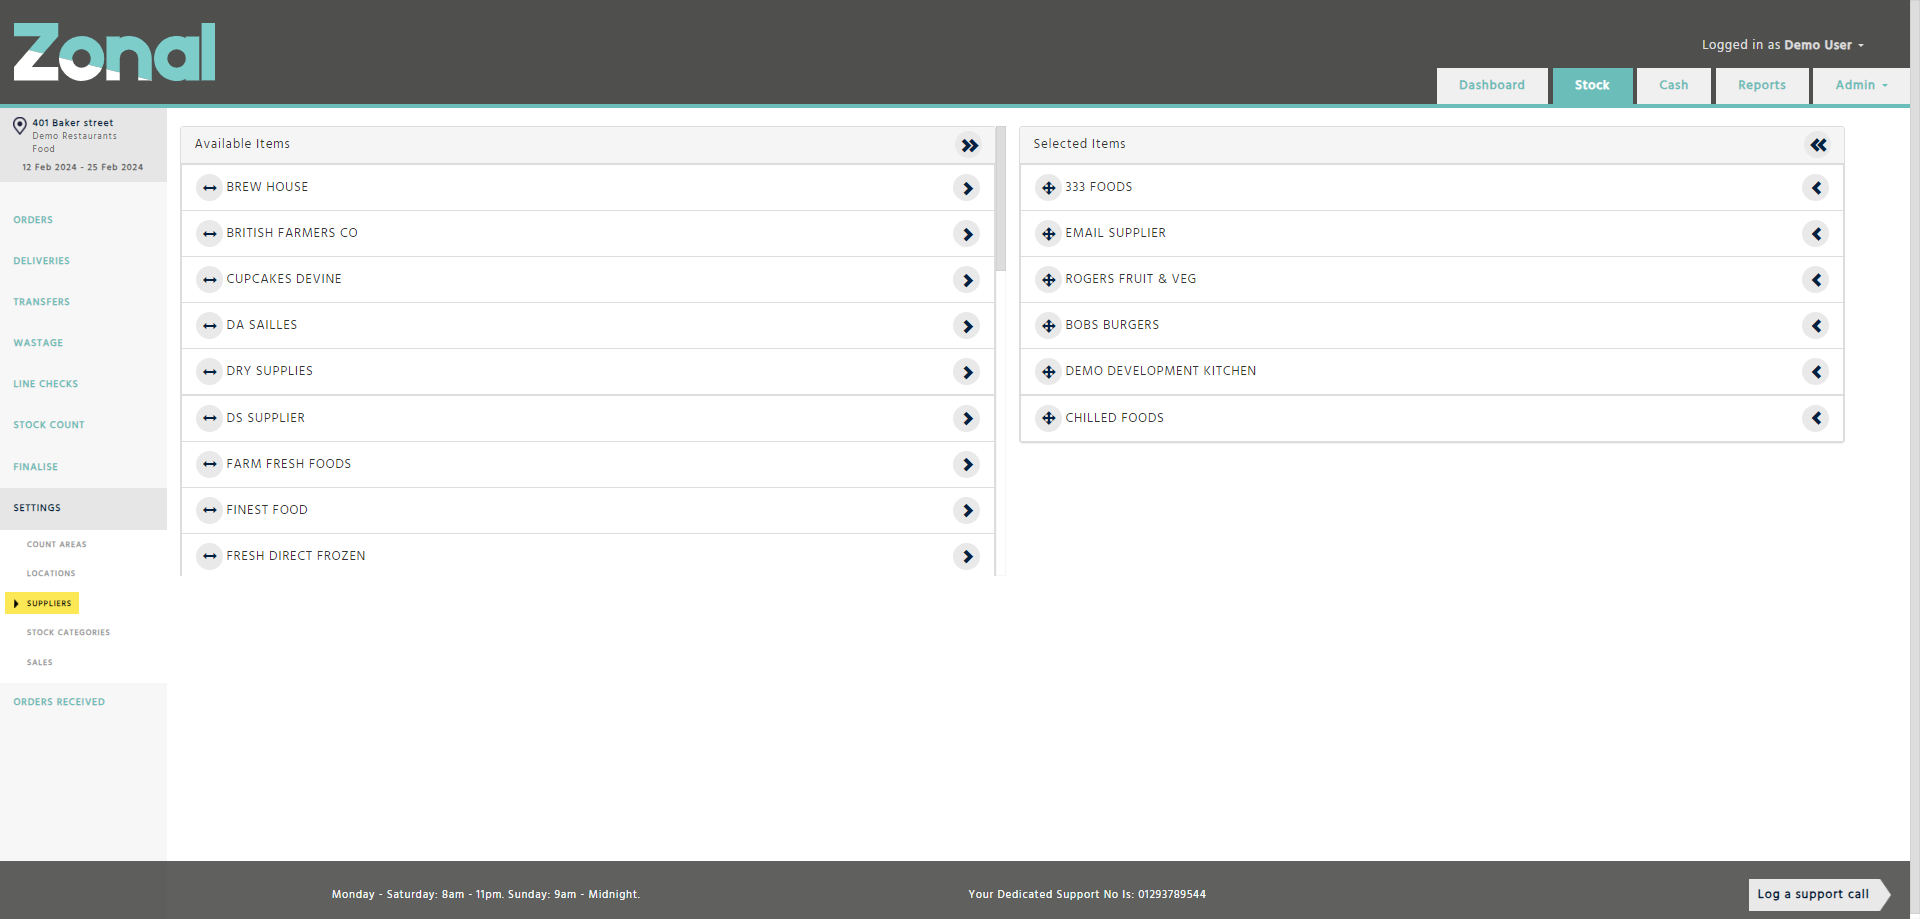
Go to the Stock application, select the Settings page from the left-hand side menu, then select the Suppliers page.
Move the relevant suppliers to the right-hand side of the page and then drag and drop them into the desired order, which will then be reflected on the Stock Count / Stock Item page.
Step 2
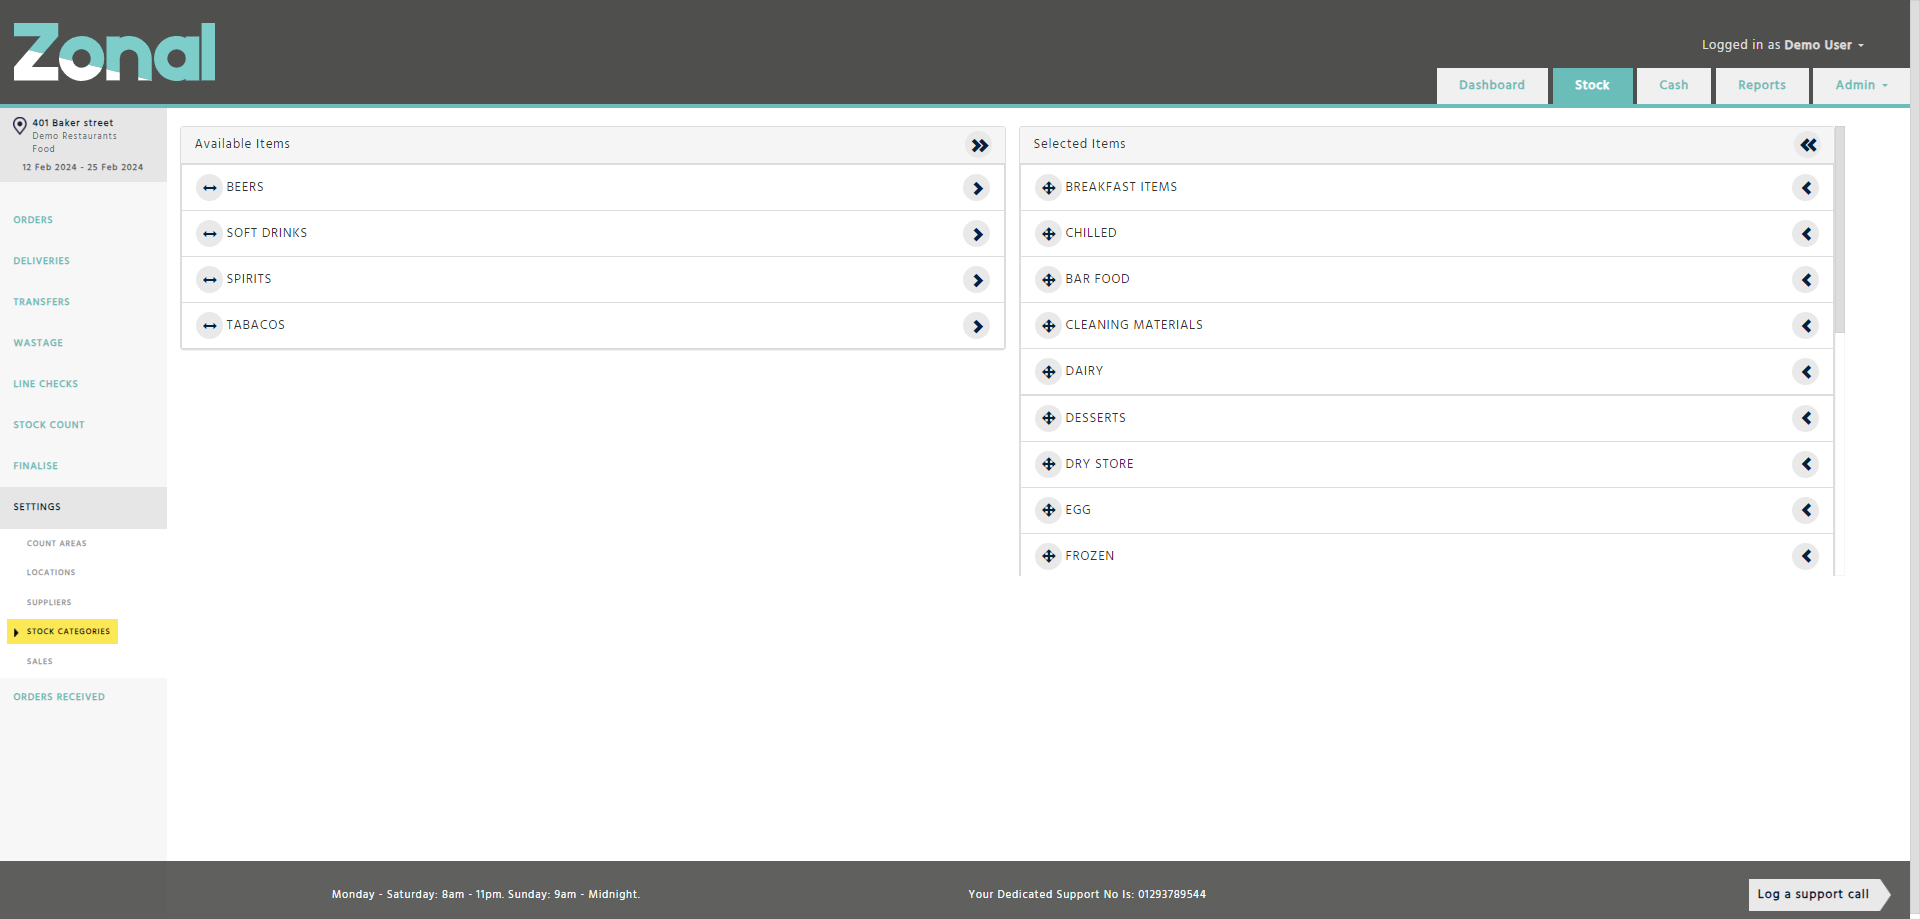
Select the Settings page from the left-hand side menu, then select the Stock Categories page.
Move the relevant stock categories to the right-hand side of the page and then drag and drop them into the desired order, which will then be reflected on the Stock Count / Stock Item page.
How to count your stock by ‘Supplier Items by Suppliers’
Step 1
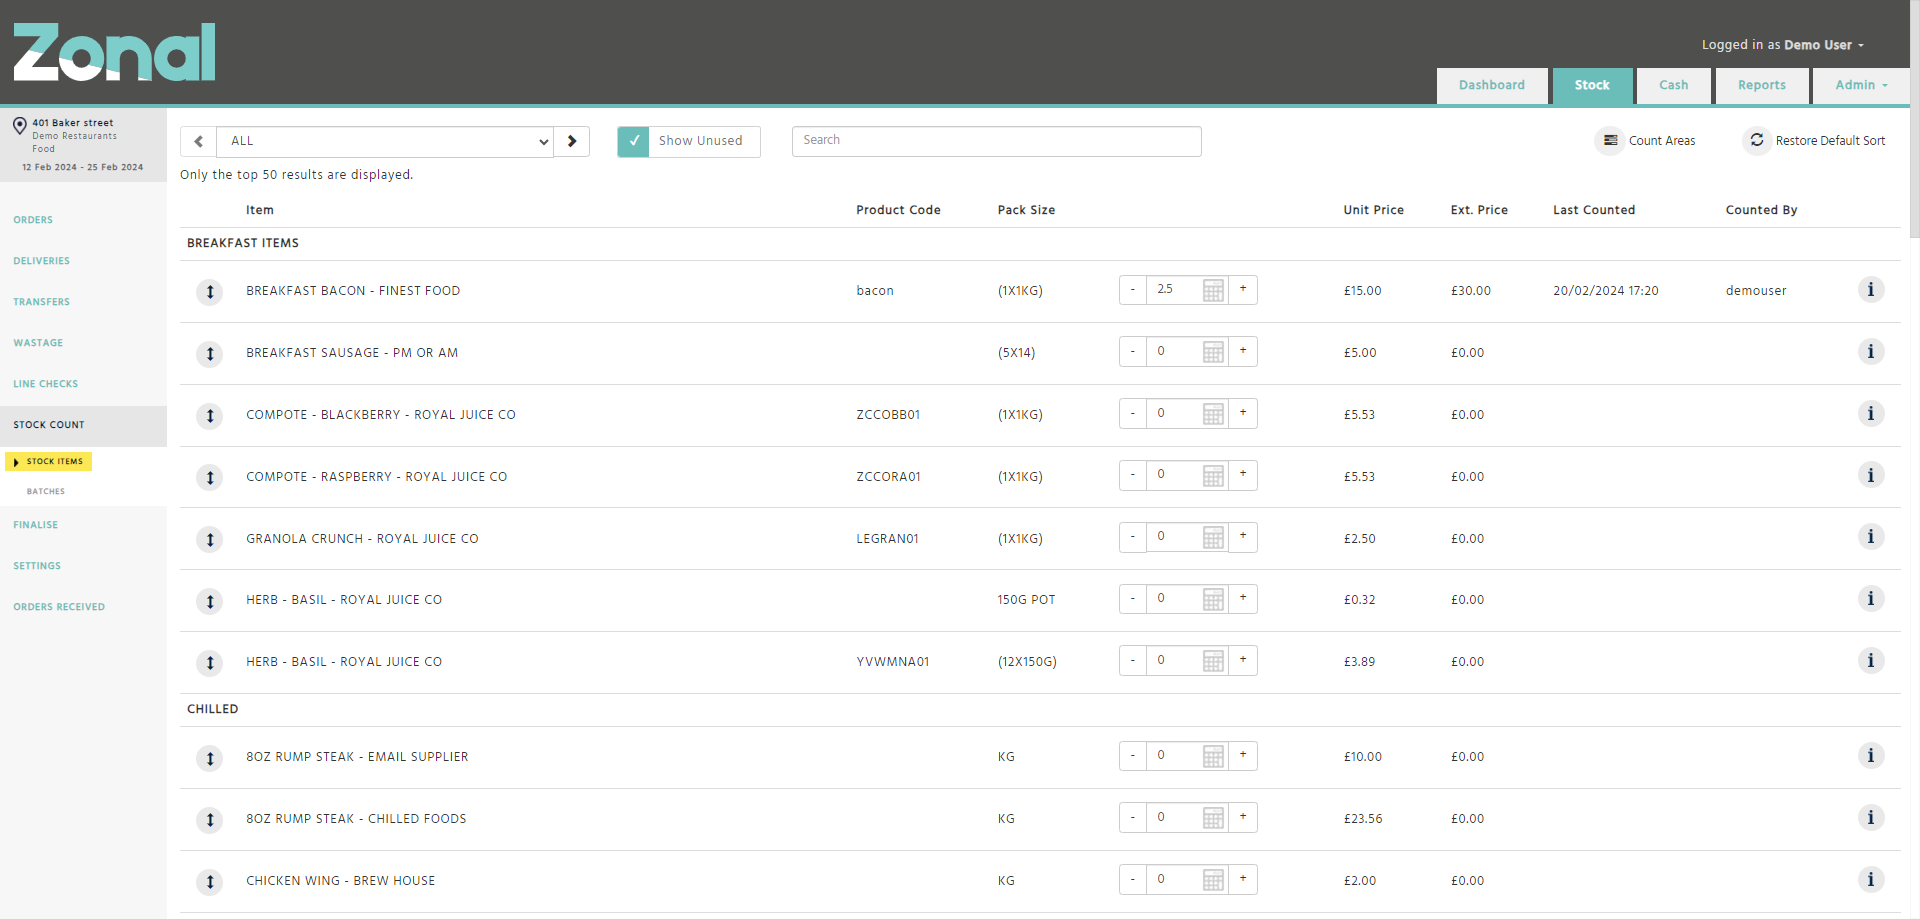
Select the Stock Count page from the left-hand side menu, then select the Stock Items page where you will be able to enter your stock count figures for each item.
You will also be able to
-
filter your items by selecting a specific supplier from the drop-down list,
-
search for a Supplier Item by its Supplier Product’s name, or by its Stock Item’s name,
-
use a pop-up calculator to help you calculate the total count,
-
use the ‘-‘ or the ‘+’ buttons to decrease or increase quantities as needed.
Please note
-
Only those Supplier Items will be displayed on the page that are flagged for counting purposes.
Supplier Items linked to Stock Items that are configured as “Non-Inventory” will not be displayed. -
By default, the page will only display those items that have been used within the last 7 days. To include unused items, click ‘Show Unused’.
-
To reorder items within a stock category, drag and drop them using the double arrow icon on the left-hand side.
-
To restore the items into an alphabetical order within each stock category, click ‘Restore Default Sort’ button.
-
To view an item’s stock movements within the current stock period, click the information icon on the right-hand side of the page.
-
New items will appear at the top of each stock category with a “!New” tag. To remove the “!New” tag from an item, simply change its sort order within the category.
-
The stock count figures you enter will be automatically saved one second after you last keystroke.
Step 2
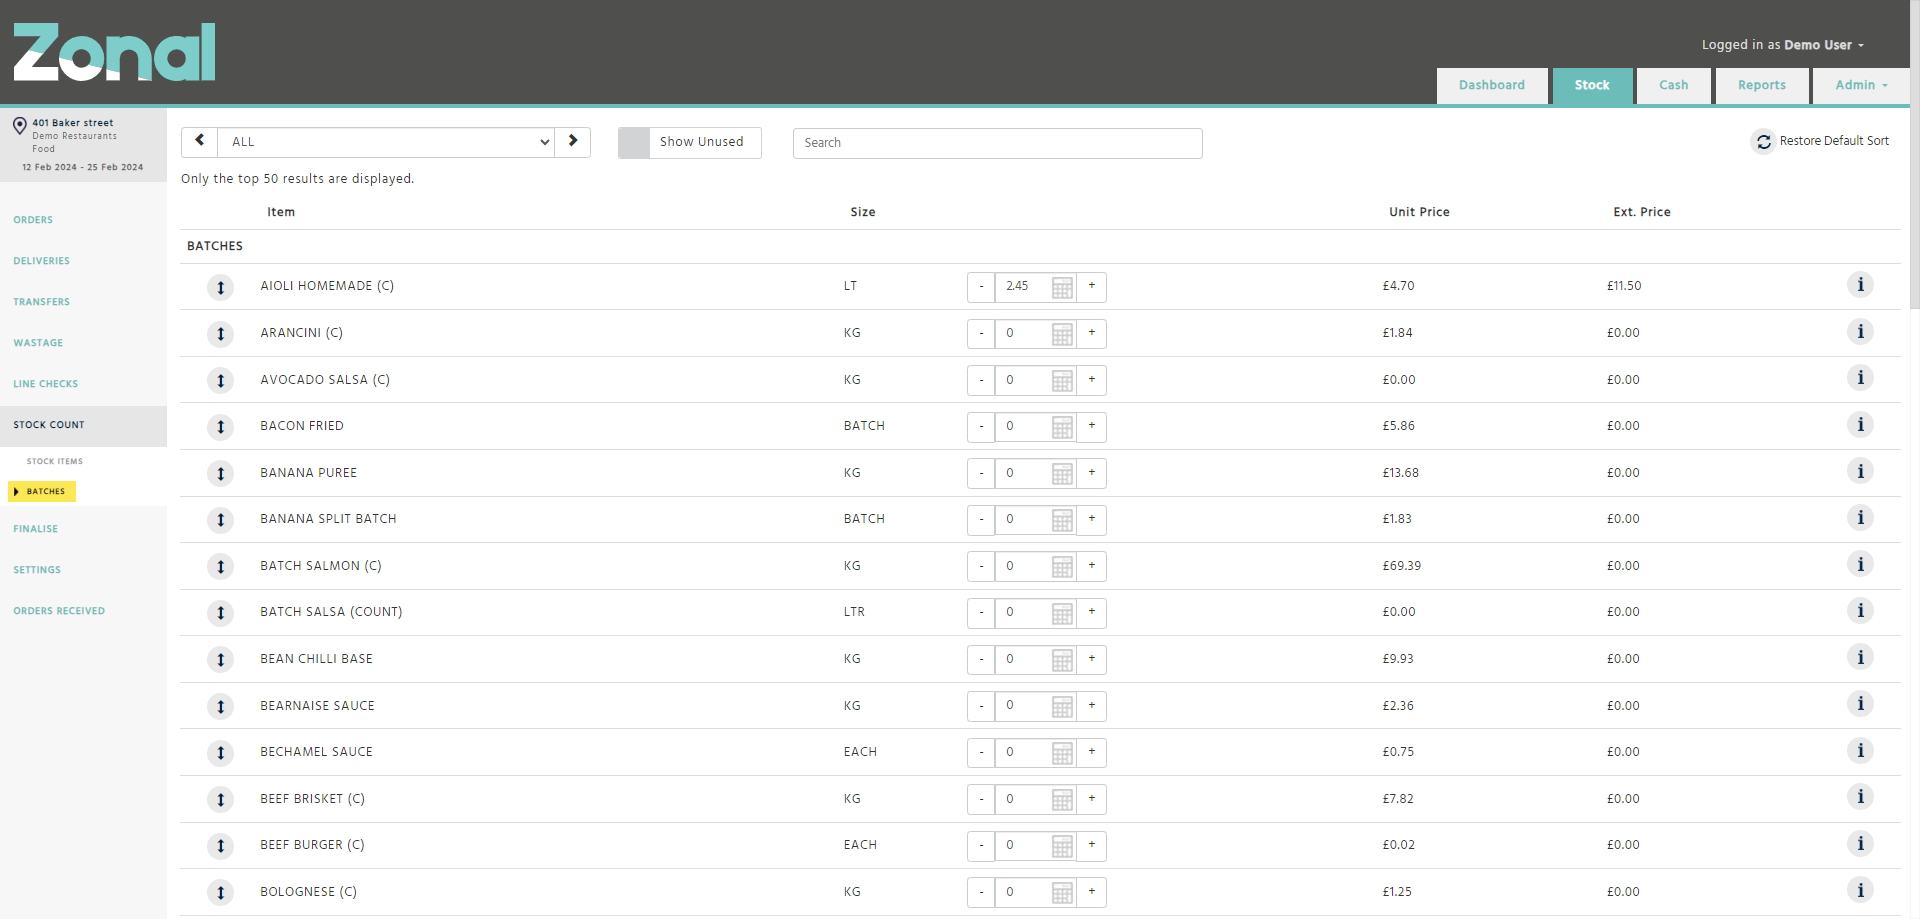
Select the Stock Count page from the left-hand side menu, then select the Batches page where you will be able to enter your stock count figures for each batch.
This page has similar functionalities as the Stock Items page; however, it will always display all countable batches for both food and drink regardless of which stock categories you have selected on your Settings / Stock Categories page.
How to count your stock by ‘Supplier Items by Categories’
Step 1
Select the Stock Count page from the left-hand side menu, then select the Stock Items page where you will be able to enter your stock count figures for each item.
You will also be able to
-
filter your items by selecting a specific category from the drop-down list,
-
search for a Supplier Item by its Supplier Product’s name, or by its Stock Item’s name,
-
use a pop-up calculator to help you calculate the total count,
-
use the ‘-‘ or the ‘+’ buttons to decrease or increase quantities as needed.
Please note
-
Only those Supplier Items will be displayed on the page that are flagged for counting purposes.
Supplier Items linked to Stock Items that are configured as “Non-Inventory” will not be displayed. -
By default, the page will only display those items that have been used within the last 7 days. To include unused items, click ‘Show Unused’.
-
To reorder items within a stock category, drag and drop them using the double arrow icon on the left-hand side.
-
To restore the items into an alphabetical order within each stock category, click ‘Restore Default Sort’ button.
-
To view an item’s stock movements within the current stock period, click the information icon on the right-hand side of the page.
-
New items will appear at the top of each stock category with a “!New” tag. To remove the “!New” tag from an item, simply change its sort order within the category.
-
The stock count figures you enter will be automatically saved one second after you last keystroke.
Step 2
Select the Stock Count page from the left-hand side menu, then select the Batches page where you will be able to enter your stock count figures for each batch.
This page has similar functionalities as the Stock Items page; however, it will always display all countable batches for both food and drink regardless of which stock categories you have selected on your Settings / Stock Categories page.

How to count your stock by ‘Stock Items by Categories’
Step 1
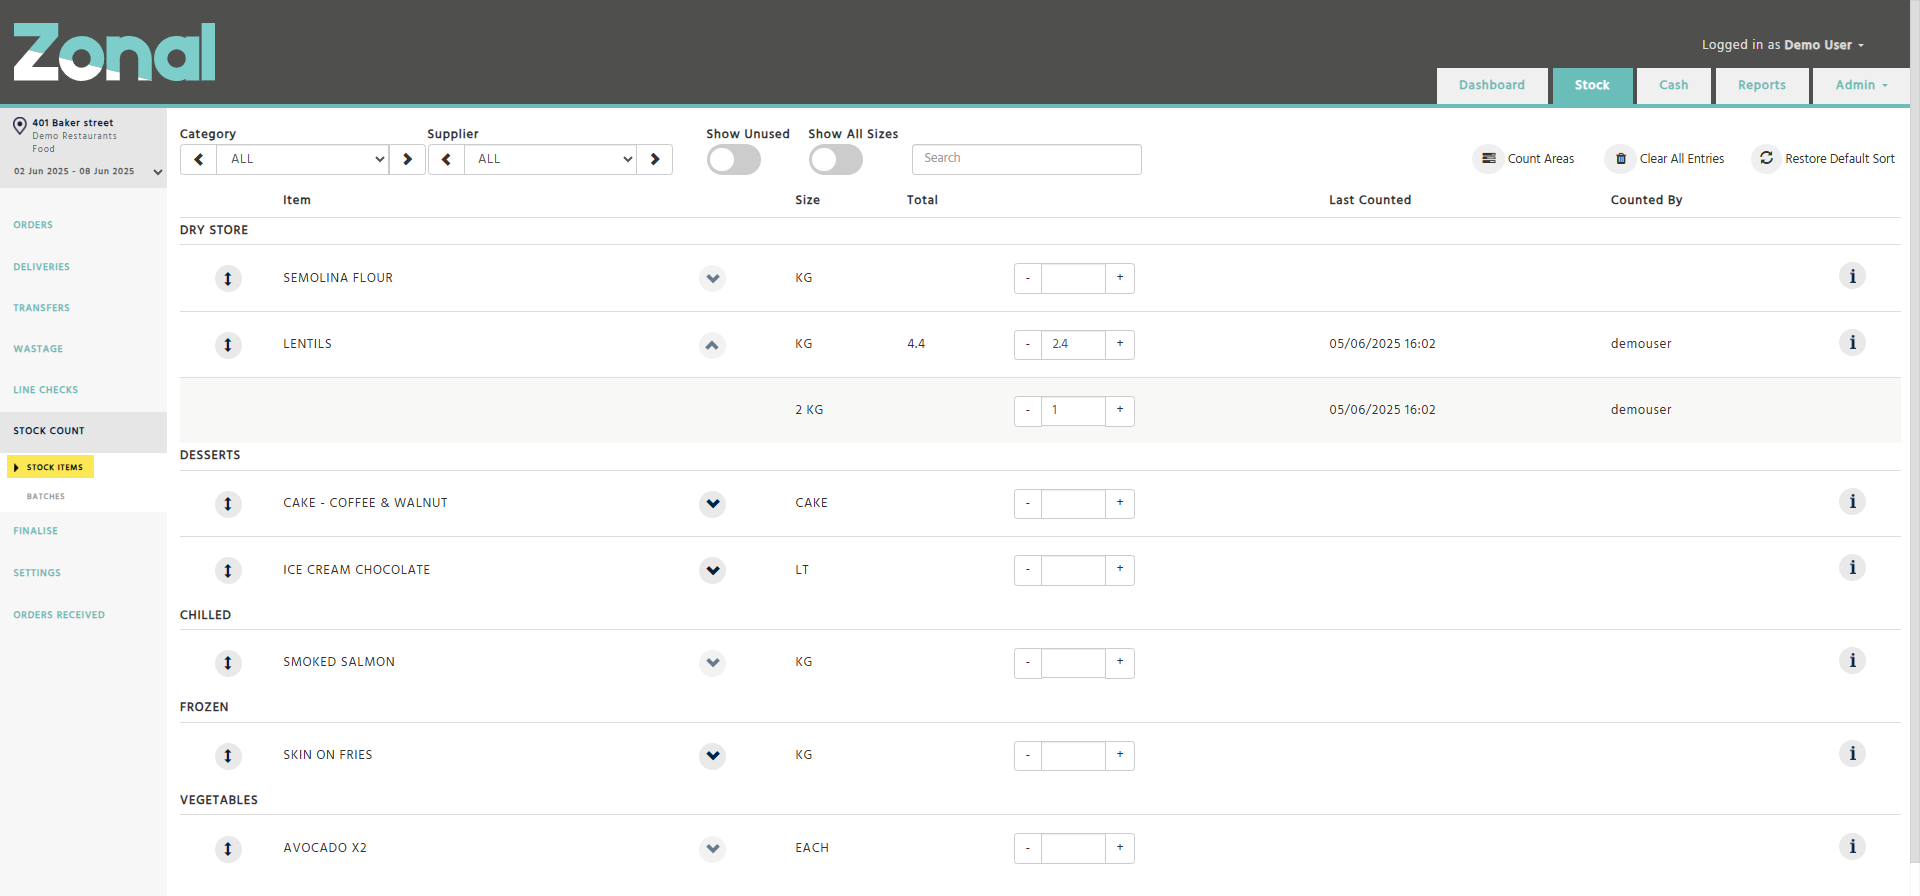
Select the Stock Count page from the left-hand side menu, then select the Stock Items page where you will be able to enter your stock count figures for each item.
You will also be able to
-
filter your items by selecting a specific category or a specific supplier from the drop-down lists,
-
search for a Stock Item by its name, External Reference, Supplier Product’s name, or by its Supplier Item’s product code,
-
perform basic calculations within each entry field via an inbuilt calculator to help you calculate the total count,
-
use the ‘-‘ or the ‘+’ buttons to decrease or increase quantities as needed.
Please note
-
Only those Stock Items will be displayed on the page that have at least one Supplier Item that is flagged for counting purposes.
Stock Items configured as “Non-Inventory” will not be displayed. -
The displayed counting sizes for each Stock Item will be determined as follows:
-
The first row will always display the Stock Item’s Reporting Size.
-
If the Stock Item’s countable Supplier Items have different Pack Sizes from the Reporting Size, you will be able to expand the first row where each alternative counting size will be displayed in separate rows.
-
-
The total stock count for all entered sizes will be displayed in the ‘Total’ column of each Stock Item’s first row.
-
By default, the page will only display those items that have been used within the last 7 days. To include unused items, click ‘Show Unused’.
-
To reorder items within a stock category, drag and drop them using the double arrow icon on the left-hand side.
-
To restore the items into an alphabetical order within each stock category, click ‘Restore Default Sort’ button.
-
To view an item’s stock movements within the current stock period, click the information icon on the right-hand side of the page.
-
New items will appear at the top of each stock category with a “!New” tag. To remove the “!New” tag from an item, either change its sort order within the category or wait and it will be removed automatically once you finalise your current stock period.
-
A stock count figure you enter will be automatically saved when you click outside of the entry field.
-
If you enter a stock count figure against an alternative counting size, you won’t be able to collapse the Stock Item’s first row.
Step 2
Select the Stock Count page from the left-hand side menu, then select the Batches page where you will be able to enter your stock count figures for each batch.
This page has similar functionalities as the Stock Items page; however, it will always display all countable batches for both food and drink regardless of which stock categories you have selected on your Settings / Stock Categories page.

‘Location Count Sheet’ report
If you prefer a physical sheet for stock counting, run and print the ‘Location Count Sheet’ report. It will always display your items in the same order as they are displayed on the Stock Count / Stock Items page, making it easy to input your closing stock.
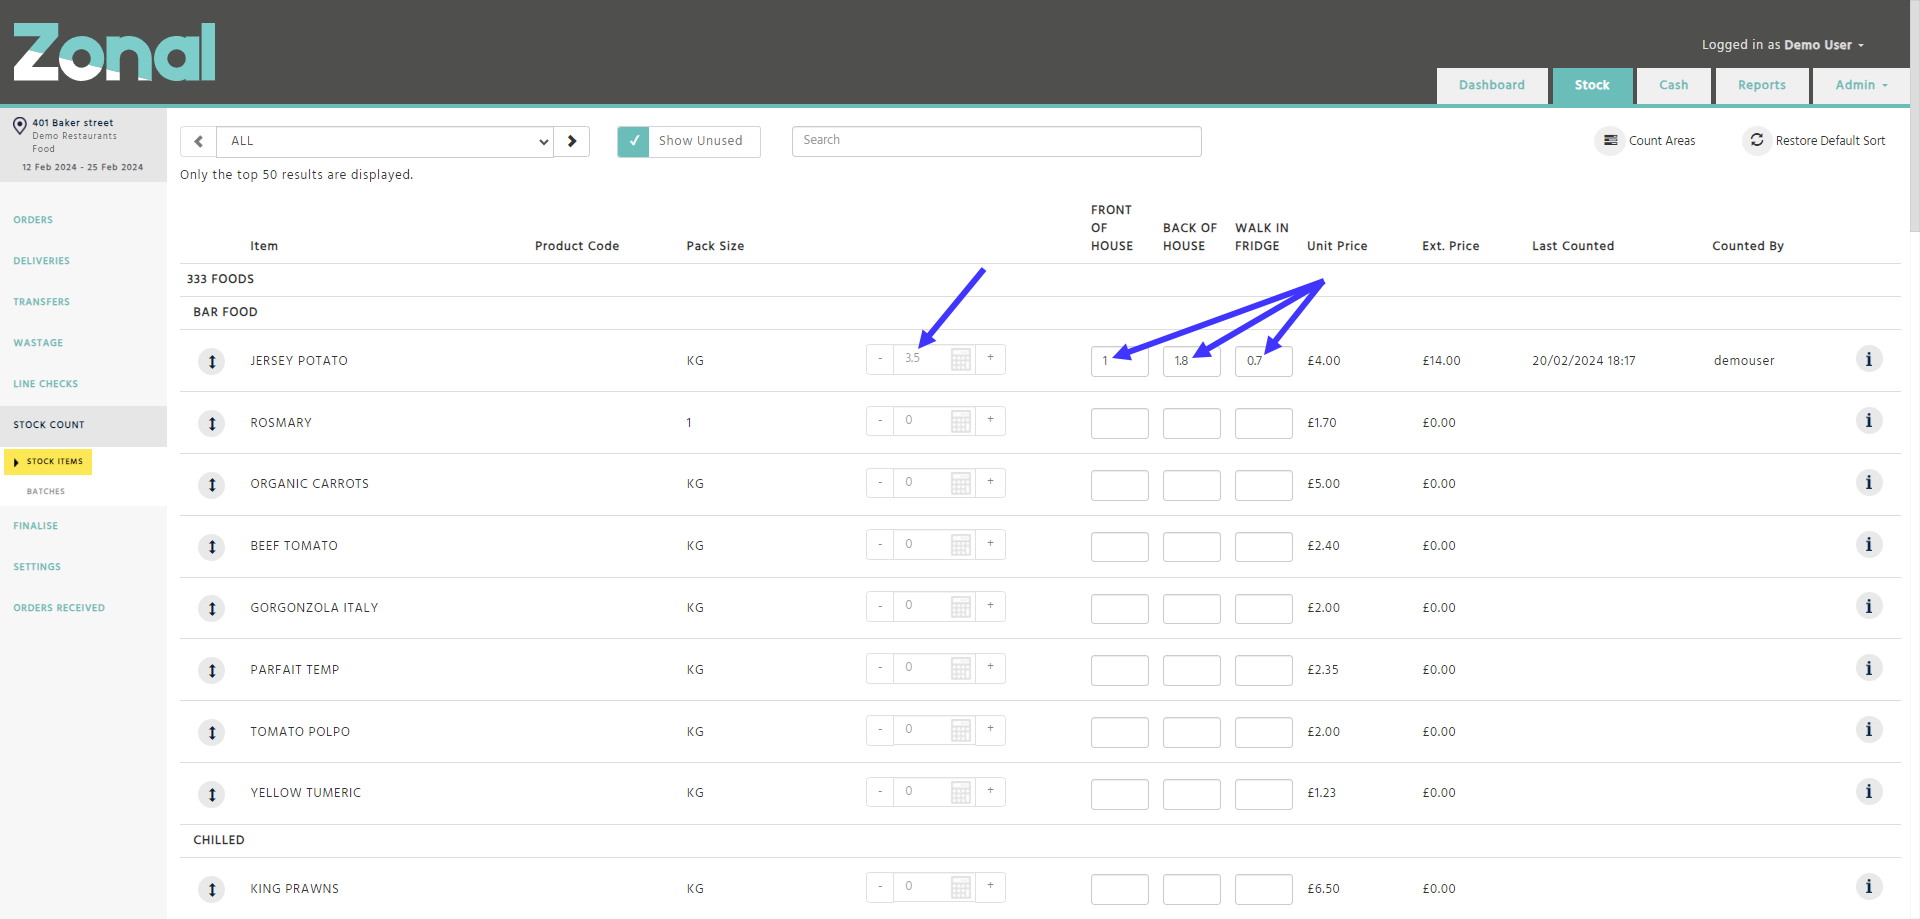
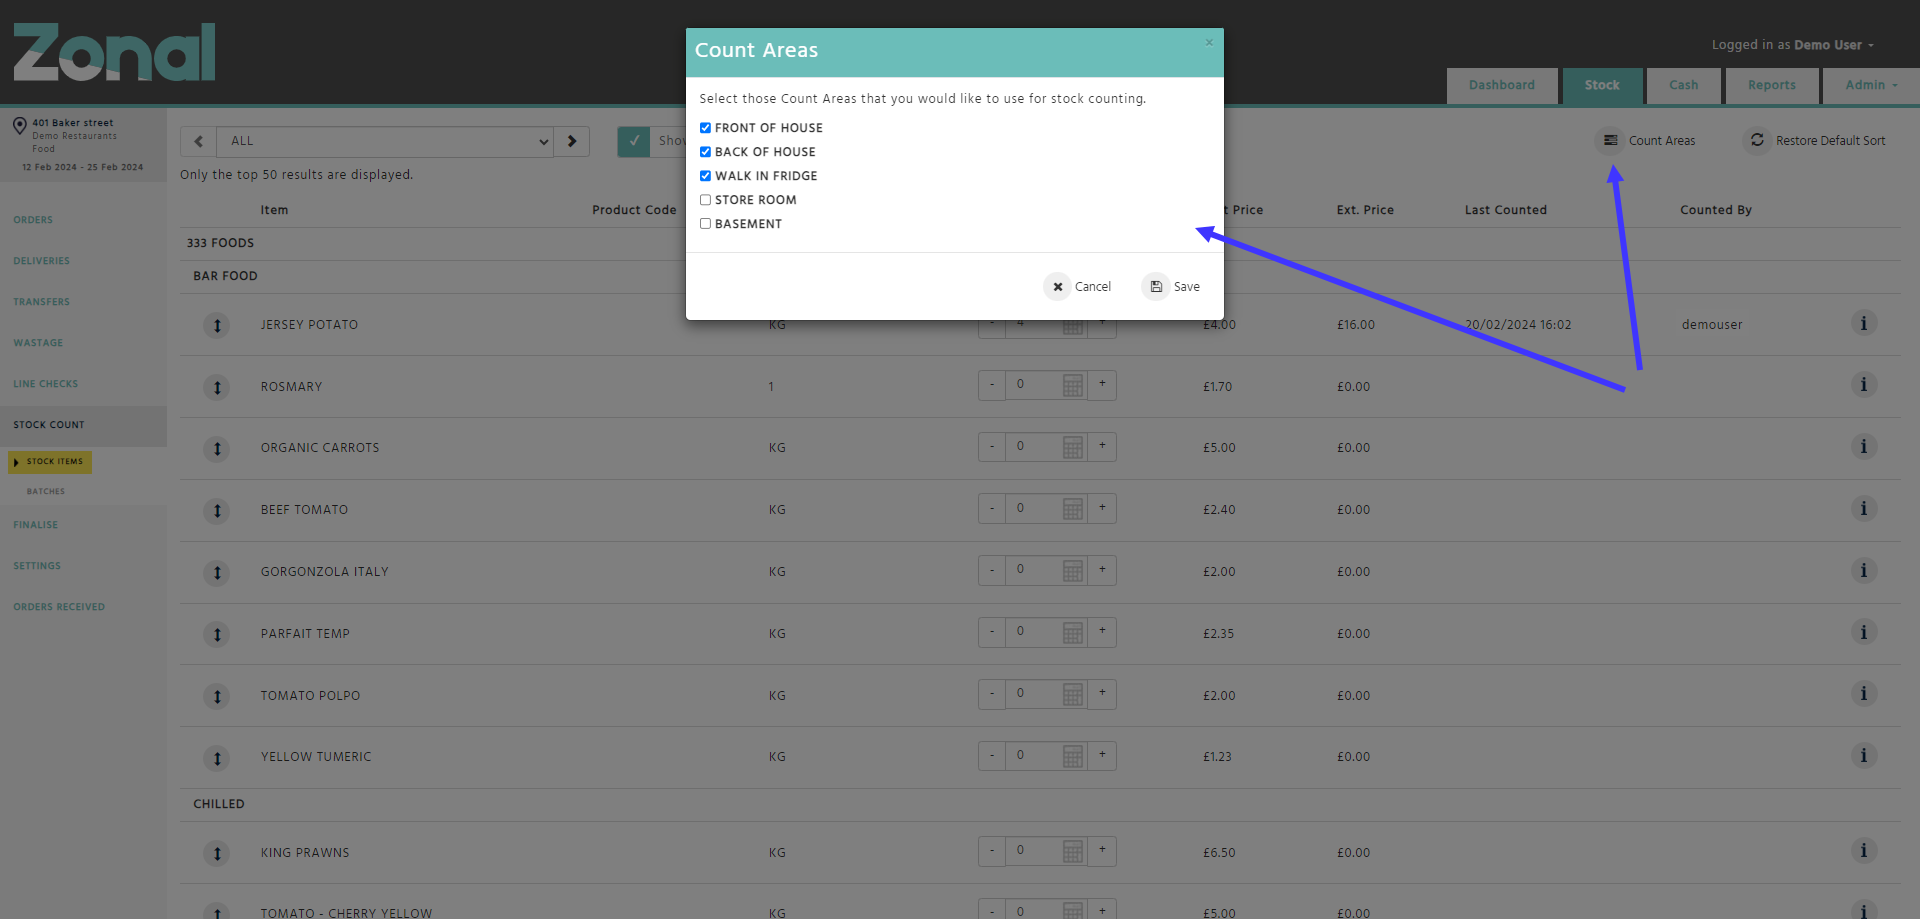
How to count your stock by count areas
If your restaurant has multiple areas where an item is counted, you won’t need to manually calculate the total figures. Instead, you can configure count areas, then once you enter the stock count figures for an item by count areas, the total will be automatically calculated on the Stock Count / Stock Items page.
Step 1
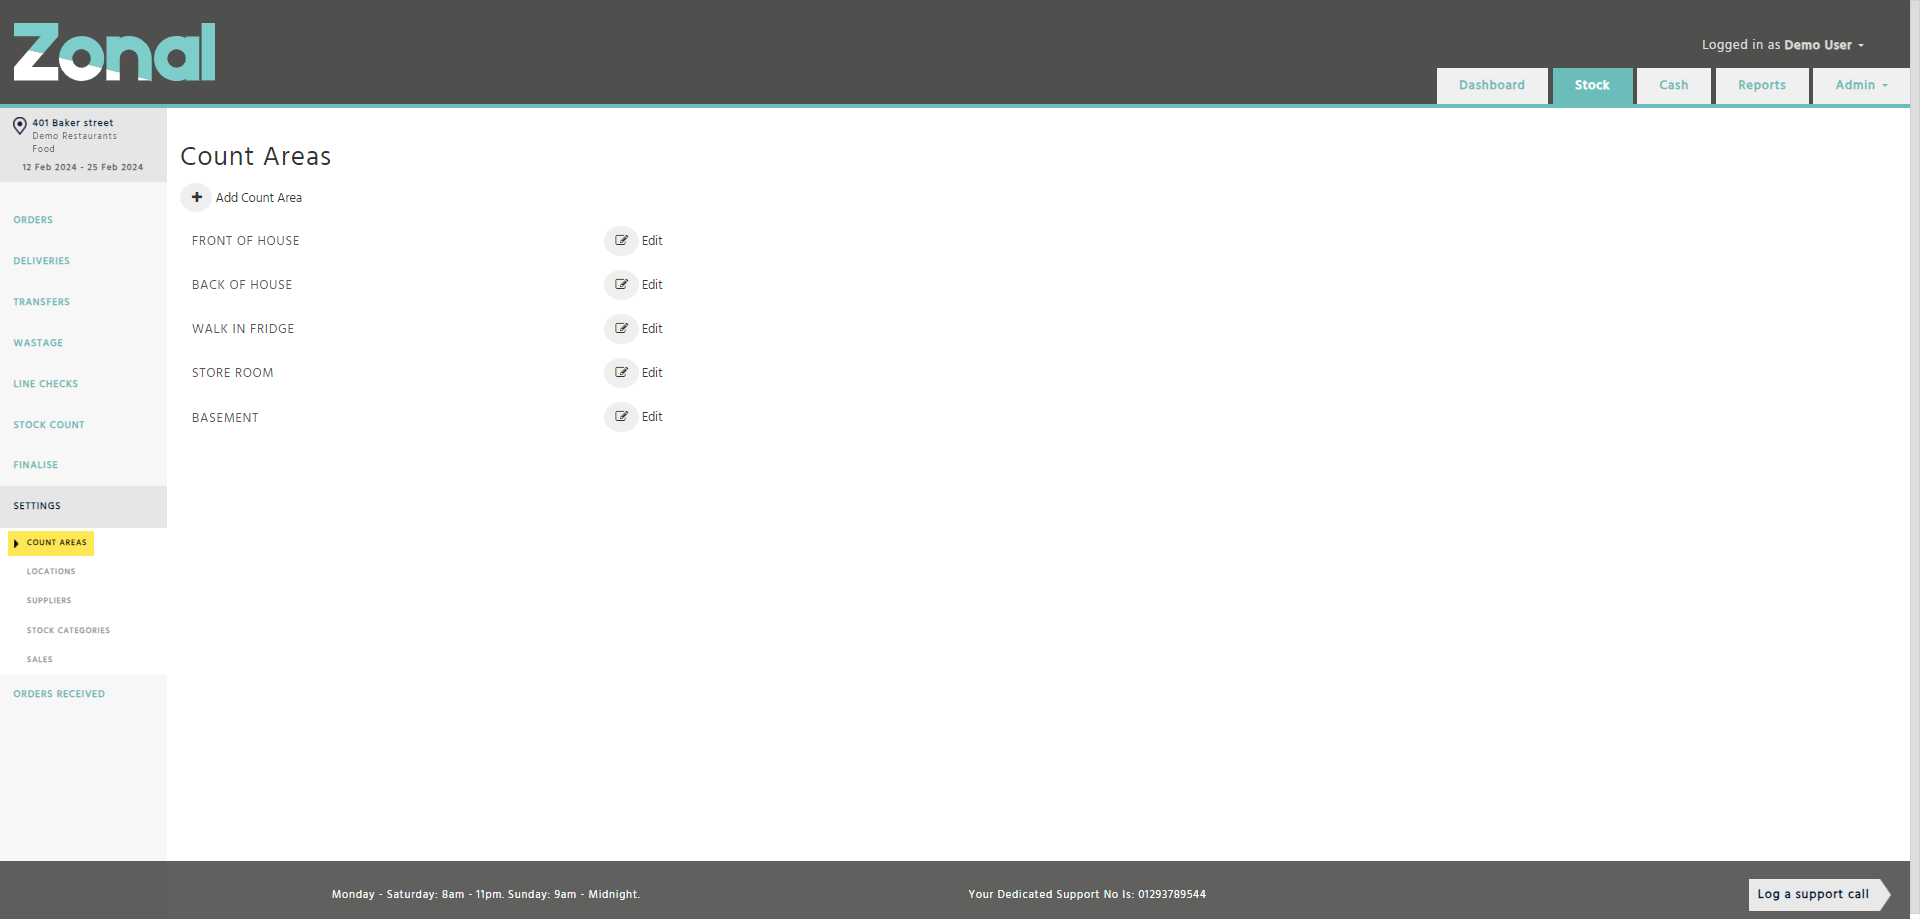
Select the Settings page from the left-hand side menu, then select the Count Areas page where you will be able to create your count areas.
Please note, you can create a maximum of 5 count areas per Cost Centre.
Step 2
Select the Stock Count page from the left-hand side menu, select the Stock Items page, then click on the ‘Count Areas’ button where you will be able to activate the relevant count areas.
Step 3
When counting an item, enter the stock count figures to the relevant count area fields, which will then be automatically added together within the disabled total column.